Getting started
Why Smallweb ?
See https://smallweb.run for a quick overview of the project.
Installation
Smallweb installations steps heavily depends on the experience you want to have with Smallweb. Here are a few options:
- Localhost Setup - Easiest way to get started, no need for a dedicated server or a domain name. Work on MacOS and Linux.
- Home Server Setup - Host you apps on your home server, and expose them to the internet using Cloudflare Tunnel. Requires a domain name.
- VPS Setup - Similar to the Home Server setup, but using a VPS Provider instead. Shows you how to setup a fresh Debian 12 VPS to host your smallweb apps.
Usage
Follow the Routing guide to learn more about the smallweb folder structure, and create your first app.
Routing
Smallweb maps every subdomains of your root domain to a directory in your root directory.
For example with, the following configuration:
// ~/.config/smallweb/config.json
{
    "domain": "example.com",
    "dir": "~/smallweb"
}
Here, api.example.com will be mapped to ~/smallweb/api, blog.example.com will be mapped to ~/smallweb/blog, and so on.
The apex domain (example.com) will be mapped to ~/smallweb/@.
If ~/smallweb/@ does not exist and ~/smallweb/www does, every request to the apex domain (example.com) will be redirected to www.example.com. Inversely, if ~/smallweb/www does not exist and ~/smallweb/@ does, every request to www.example.com will be redirected to the example.com.
If you want to opt-out of this behavior, you can create a ~/smallweb/@ directory, which will be mapped to the root domain.
Custom domains
In addition to your base domain, you can also map custom domains to apps from your global config.
{

    "domain": "example.com",
    "dir": "~/smallweb",
    "customDomains": {
        "pomdtr.me": "pomdtr"
    }
}
In this example, pomdtr.me will be mapped to ~/smallweb/pomdtr, meaning that the pomdtr app will be accessible both at:
https://pomdtr.example.comhttps://pomdtr.me
You can also map wildcards to apps by using the * character.
{
    "domain": "example.com",
    "dir": "~/smallweb",
    "customDomains": {
        "pomdtr.me": "pomdtr",
        "sandbox-*.pomdtr.me": "pomdtr"
    }
}
Hosting Websites
Smallweb can also host dynamic websites. To create a dynamic website, you need to create a folder with a main.[js,ts,jsx,tsx] file in it.
The file should export a default object with a fetch method that takes a Request object as argument, and returns a Response object.
// File: ~/smallweb/example-server/main.ts

export default {
  fetch(request: Request) {
    const url = new URL(request.url);
    const name = url.searchParams.get("name") || "world";

    return new Response(`Hello, ${name}!`, {
      headers: {
        "Content-Type": "text/plain",
      },
    });
  },
}
To access the server, open https://example-server.localhost in your browser.
Using JSX
You can use the @jsxImportSource pragma to define the source of the jsx factory function. This allows you to use jsx in your server code.
// File: ~/smallweb/jsx-example/main.tsx
/** @jsxImportSource npm:@preact **/
import render from "npm:preact-render-to-string";

const requestHandler = () => new Response(render(<h1>Hello, world!</h1>), {
  headers: {
    "Content-Type": "text/html",
  },
});

export default { fetch: requestHandler };
To access the server, open https://jsx-example.localhost in your browser.
Routing Requests using Hono
Smallweb use the deno runtime to evaluate the server code. You get typescript and jsx support out of the box, and you can import any module from the npm and jsr registry by prefixing the module name with npm: or jsr:.
As an example, the following code snippet use the @hono/hono extract params from the request url.
// File: ~/smallweb/hono-example/main.ts

import { Hono } from "jsr:@hono/hono";

const app = new Hono();

app.get("/", c => c.text("Hello, world!"));

app.get("/:name", c => c.text(`Hello, ${c.params.name}!`));

// Hono instances have a `fetch`, so they can be used as the default export
export default app;
To access the server, open https://hono-example.localhost in your browser.
Static Websites
If your smallweb does not contains a main.[js,ts,jsx,tsx] file, Smallweb will serve the folder as a static website.
You can create a website by just adding an index.html file in the folder.
<!-- File: ~/smallweb/example-static/index.html -->
<!DOCTYPE html>
<html>
  <head>
    <title>Example Static Website</title>
  </head>
  <body>
    <h1>Hello, world!</h1>
  </body>
</html>
To access the website, open https://example-static.localhost in your browser.
The static server also supports transpiling .ts, .tsx, .jsx, meaning that you can just import them from your static website.
<!-- ~/smallweb/example-static/index.html -->
<!DOCTYPE html>
<html>
  <head>
    <title>Example Static Website</title>
  </head>
  <body>
    <div id="root"></div>
    <script src="script.tsx"></script>
  </body>
You'll need to add a pragma to the script file to tell smallweb how to transpile it.
// ~/smallweb/example-static/script.tsx
/** @jsxImportSource https://esm.sh/react **/
import { render } from "react-dom";

render(<h1>Hello, world!</h1>, document.getElementById("root"));
Only use imports that are usable from the browser. jsr: and npm: specifiers are not supported in the browser.
If your static website contains a main.js file, but you want to serve it as a static website, you can do the following:
- rename it to something else
- create a smallweb.json with the following content:
{
  "entrypoint": "smallweb:static"
}
Adding cli commands to your app
To add a cli command to your app, you'll need to add a run method to your app's default export.
// File: ~/smallweb/custom-command/main.ts
export default {
    run(args: string[]) {
        console.log("Hello world");
    }
}
Use smallweb run to execute the command:
$ smallweb run custom-command
Hello world
Using a cli framework
Cliffy is an excellent Deno CLI framework that you can use to build more complex CLI applications.
You can easily wire it to smallweb:
import { Command } from "jsr:@cliffy/[email protected]";

const name = basename(Deno.cwd());
const command = new Command().name().action(() => {
    console.log(`Hello ${name}`);
});

export default {
    run(args: string[]) {
        await command.parse(args);
    }
}
Setting env variables
You can set environment variables for your app by creating a file called .env in the application folder.
Here is an example of a .env file:
BEARER_TOKEN=SECURE_TOKEN
Use the Deno.env.get method to access the environment variables in your app:
// File: ~/smallweb/demo/main.ts
export default function (req: Request) {
  if (req.headers.get("Authorization") !== `Bearer ${Deno.env.get("BEARER_TOKEN")}`) {
    return new Response("Unauthorized", { status: 401 });
  }

  return new Response(`I'm private!`, {
    headers: {
      "Content-Type": "text/plain",
    },
  });
}
If you want to set an environment variable for all your apps, you can use the env property from the smallweb global config.
// ~/.config/smallweb/config.json
{
    "env": {
        "BEARER_TOKEN": "SECURE_TOKEN"
    }
}
Cron Tasks
You can register configure cron tasks from your smallweb.json[c].
{
    "crons": [
        {
            "name": "daily-task",
            "schedule": "0 0 * * *",
            "args": [],
        }
    ]
}
The schedule field is a cron expression that defines when the task should run. It follows the standard cron syntax, with five fields separated by spaces. You can also use the following shortcuts:
@hourly: Run once an hour, at the beginning of the hour.@daily: Run once a day, at midnight.@weekly: Run once a week, at midnight on Sunday.@monthly: Run once a month, at midnight on the first day of the month.@yearly: Run once a year, at midnight on January 1st.
In order to handle the cron tasks, your app default export should have a run method that will be called when the task is triggered.
export default {
    run(_args: string[]) {
        console.log("Running daily task");
    }
}
If you want to see a list of all cron tasks, you can run:
smallweb cron ls
To trigger one, you can use either the smallweb cron trigger or the smallweb run command:
smallweb cron trigger daily-task
Smallweb Plugins
The smallweb CLI can be extennded with plugins. To create a new plugin, just add a binary to your PATH that starts with smallweb- and the CLI will automatically detect it.
For example, if you create a new smallweb-choose file in your PATH with the following content:
#!/bin/sh

# check if fzf is installed
if ! command -v fzy 2> /dev/null
then
    echo "fzf could not be found" >&2
    echo "Please install fzf to use this script" >&2
    echo "Docs: https://github.com/junegunn/fzf?tab=readme-ov-file#installation" >&2
    exit 1
fi

smallweb list | cut -f1 | fzf | xargs smallweb open --app
And make it executable with chmod +x smallweb-choose, you will be able to run smallweb choose and get an interactive list of your apps to choose from, which will then be opened in your default browser.
Example Plugins
simpl-site can be installed as a smallweb plugin. You can install it using the following command:
deno install -Agf jsr:@iamseeley/simpl-site/smallweb-simpl-site
You will then be able to run smallweb simpl-site to create a new static site.
Templates
Smallweb comes with a list of templates to help you get started with your project. You can use the smallweb init command to create a new project.
smallweb app create <name>
You can also specify custom a template to use:
smallweb app create <name> --template pomdtr/smallweb-template-http
Any github repository can be used as a template. View a list of the available templates here.
To create your own template, just add the smallweb-template topic to your repository, and it will be automatically added to the list of available templates.
Private Apps
You can automatically protects private apps behind a login prompt. In order to achieve this, you'll need to:
-
Add an
emailfield to your global config// ~/.config/smallweb/config.json { "email": "[email protected]" } -
Set the private field to true in your app's config.
// ~/smallweb/private-app/smallweb.json
{
    "private": true
}
The next time you'll try to access the app, you'll be prompted with a login screen (provided by lastlogin.net).
Additionaly, you can generate tokens for non-interactive clients using the smallweb token create command.
smallweb token create --description "CI/CD pipeline"
Then, you can pass this token in the Authorization header of your requests.
curl https://private-app.smallweb.run -H "Authorization: Bearer <token>"
or alternatively, use the basic auth username.
curl https://private-app.smallweb.run -u "<token>"

# or
curl https://<token>@private-app.smallweb.run
If your app is public, but you still want to protect some routes, you can use the privateRoutes field in your app's config.
// ~/smallweb/private-app/smallweb.json
{
    "privateRoutes": ["/private/*"]
}
There is also a publicRoutes field that you can use to protect all routes except the ones listed.
{
    "private": true,
    "publicRoutes": ["/public/*"]
}
REST API
Each smallweb installation comes with a built-in REST API. You can map it to a subdomain by creating a smallweb.json manifest:
// ~/smallweb/api/smallweb.jsonc
{
    "entrypoint": "smallweb:api",
    // make sure to protect your API
    "private": true,
    "publicRoutes": [
        // openapi manifest
        "/openapi.json",
        // json schemas for config files
        "/schemas/*"
    ]
}
A swagger UI is available at the root of the api, allowing you to easily test the available endpoints.
Authentication
You'll need to generate a bearer token to access the API. You can create one by running the following command:
smallweb token create --description "api token" --app <api-subdomain>
You'll then be able to use it to authenticate your requests using this token:
curl https://<api-domain>/v0/apps -H "Authorization: Bearer <token>"
Or you can just use the smallweb api command, which automatically authenticates your requests:
smallweb api /v0/apps
Client Library
Since the API is based on OpenAPI, you can easily generate client libraries for your favorite language.
For usage in smallweb apps, I personally recommend using feTS.
Here is an example of how you can use it (no code-gen required):
import { createClient, type NormalizeOAS } from 'npm:fets'
import type openapi from 'jsr:@smallweb/openapi@<smallweb-version>'

const client = createClient<NormalizeOAS<typeof openapi>>({
    endpoint: Deno.env.get("SMALLWEB_API_URL"),
    globalParams: {
        headers: {
            Authorization: `Bearer ${Deno.env.get("SMALLWEB_API_TOKEN")}`
        }
    }
})

const res = await client['/v0/apps'].get()
if (!res.ok) {
    throw new Error(`Failed to fetch apps: ${res.statusText}`)
}

const apps = await res.json() // typed!
Webdav Server
The rest api bundles a webdav server that you can use to manage your files. It is accessible at: https://<api-domain>/webdav.
You can easily connect it to any webdav client:
Windows
- Open the File Explorer.
- Click on the
Computertab. - Click on
Map network drive. - Enter the URL of the webdav server in the
Folderfield. - Click
Finish. - Enter your Smallweb username and password.
- Click
OK.
MacOS
- Open the Finder.
- Click on
Goin the menu bar. - Click on
Connect to Server. - Enter the URL of the webdav server in the
Server Addressfield. - Click
Connect. - Enter your Smallweb username and password.
- Click
Connect. - Click
Done.
Linux (Ubuntu)
- Open Nautilus / Files.
- Click on
Other Locations. - Enter the URL of the webdav server, and prefix with
davs://(ex:davs://<api-domain>/webdav). - Click
Connect. - Enter your Smallweb username and password.
- Click
Connect.
Android
Material Files has built-in support for WebDAV.
Javascript
I'm still searching for a good webdav client in javascript. The best I found so far is webdav-client, but I don't really like it.
Still, here is an example of how you can use it:
import * as webdav from 'webdav'

const webdavClient = webdav.createClient(new URL("/webdav", Deno.env.get("SMALLWEB_API_URL")).href, {
    authType: webdav.AuthType.Password,
    username: Deno.env.get("SMALLWEB_API_TOKEN")
})

const apps = await webdavClient.getDirectoryContents("/")
App Sandbox
Smallweb apps have access to:
- read and write access to their own directory, and the deno cache directory.
- access to the network, to make HTTP requests.
- access to the env files defined in the global config and in the
.envfile in the app directory.
This sandbox protects the host system from malicious code, and ensures that apps can only access the resources they need.
Sharing files between apps
To share files between your apps, just use symbolic links!
For example, if you have two apps app1 and app2, and you want app2 to have access to the files in the data directory of app1, you can create a symbolic link in the app2 directory:
ln -s $HOME/smallweb/app1/data $HOME/smallweb/app2/data
Linking files outside the smallweb directory also work, but it causes issues when syncing the files between different machines, so you should only use it if you only want to edit your files on one machine.
Hosting the Docs
Each smallweb instance bundle it's own documentation! You can serve it using the following smallweb.json:
// ~/smallweb/docs/smallweb.json
{
    "entrypoint": "smallweb:docs"
}
This page will guide you through the process of setting up your local environment for smallweb on MacOS.
This setup is useful for developing and testing smallweb apps locally, without having to deploy them to the internet.
If you want to expose your apps to the internet instead, you can follow the Cloudflare Tunnel setup guide.
Architecture
The following diagram illustrates the architecture of the local setup:
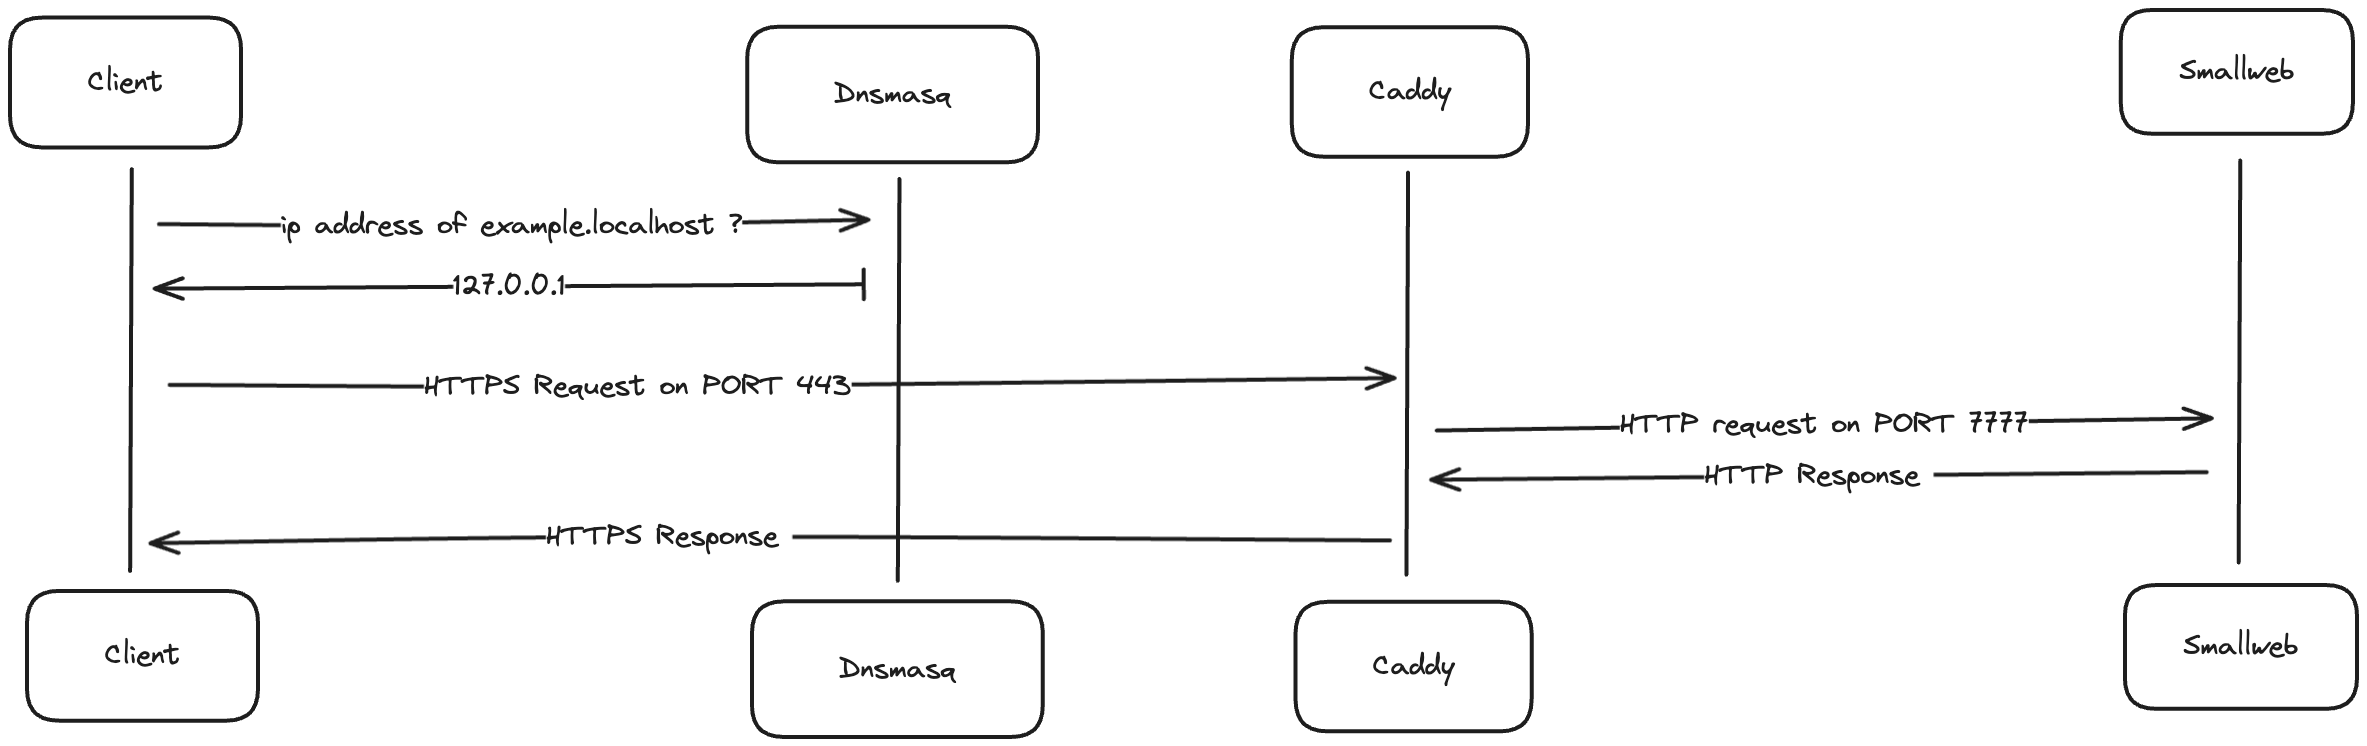
The components needed are:
- a dns server to map
*.localhostdomains to127.0.0.1ip address (dnsmasq) - a reverse proxy to automatically generate https certificates for each domain, and redirect traffic to the smallweb evaluation server (caddy)
- a service to map each domain to the corresponding folder in ~/smallweb, and spawn a deno subprocess for each request (smallweb)
MacOS setup
In the future, we might provide a script to automate this process, but for now, it's a manual process.
Install Brew
# install homebrew (if not already installed)
/bin/bash -c "$(curl -fsSL https://raw.githubusercontent.com/Homebrew/install/HEAD/install.sh)"
Install Deno
brew install deno
Setup Smallweb
brew install pomdtr/tap/smallweb
smallweb service install
Setup Caddy
Caddy’s configuration path depends on whether you're using an Intel-based Mac or an Apple Silicon (M1/M2) Mac.
- For Apple Silicon (M1/M2) Macs:
The default installation path is
/opt/homebrew/etc/Caddyfile. - For Intel-based Macs:
The default installation path is
/usr/local/etc/Caddyfile.
Apple Silicon (M1/M2):
brew install caddy

# Write caddy configuration
cat <<EOF > /opt/homebrew/etc/Caddyfile
*.localhost {
  tls internal {
    on_demand
  }

  reverse_proxy localhost:7777
}
EOF
Intel-based:
brew install caddy

# Write caddy configuration
cat <<EOF > /usr/local/etc/Caddyfile
*.localhost {
  tls internal {
    on_demand
  }

  reverse_proxy localhost:7777
}
EOF
Run Caddy:
# Run caddy in the background
brew services start caddy

# Add caddy https certificates to your keychain
caddy trust
Setup dnsmasq
The configuration path for dnsmasq also depends on your Mac's architecture.
Apple Silicon (M1/M2):
brew install dnsmasq

# Write dnsmasq configuration
echo "address=/.localhost/127.0.0.1" >> /opt/homebrew/etc/dnsmasq.conf
Intel-based:
brew install dnsmasq

# Write dnsmasq configuration
echo "address=/.localhost/127.0.0.1" >> /usr/local/etc/dnsmasq.conf
Run dnsmasq:
# Run dnsmasq in the background
sudo brew services start dnsmasq

# Indicates to the system to use dnsmasq for .localhost domains
sudo mkdir -p /etc/resolver
cat <<EOF | sudo tee -a /etc/resolver/localhost
nameserver 127.0.0.1
EOF
Testing the setup
First, let's create a dummy smallweb website:
mkdir -p ~/smallweb/example
cat <<EOF > ~/smallweb/example/main.ts
export default {
  fetch() {
    return new Response("Smallweb is running", {
      headers: {
        "Content-Type": "text/plain",
      },
    });
  }
}
EOF
If everything went well, you should be able to access https://example.localhost in your browser, and see the message Smallweb is running.
Ubuntu / Debian setup
Install Deno
curl -fsSL https://deno.land/install.sh | sh
# add ~/.deno/bin to PATH
echo "export PATH=\$PATH:\$HOME/.deno/bin" >> ~/.bashrc
Setup Smallweb
curl -fsSL https://install.smallweb.run | sh
# add ~/.local/bin to PATH
echo "export PATH=\$PATH:\$HOME/.local/bin" >> ~/.bashrc
smallweb service install
Setup Caddy
sudo apt install -y caddy

# Write caddy configuration
cat <<EOF > /etc/caddy/Caddyfile
*.localhost {
  tls internal {
    on_demand
  }

  reverse_proxy localhost:7777
}
EOF

sudo systemctl restart caddy

caddy trust
There is no need to setup dnsmasq on Ubuntu, as it seems to be already configured to resolve .localhost domains to 127.0.0.1.
Testing the setup
First, let's create a dummy smallweb website:
mkdir -p ~/smallweb/example
CAT <<EOF > ~/smallweb/example/main.ts
export default {
  fetch() {
    return new Response("Smallweb is running", {
      headers: {
        "Content-Type": "text/plain",
      },
    });
  }
}
EOF
If everything went well, you should be able to access https://example.localhost in your browser, and see the message Smallweb is running.
Cloudflare Tunnel is a free service that allows you to expose your local server to the internet, without having to expose your local IP address.
Additionally, it provides some protection against DDoS attacks, and allows you to use Cloudflare's other services like Access.
Setup
-
Make sure that you have a domain name that you can manage with Cloudflare.
-
Install smallweb on your server, and register it as a service.
// install deno curl -fsSL https://deno.land/install.sh | sh // install smallweb curl -sSfL https://install.smallweb.run | sh // register smallweb as a service smallweb service install // make sure that the server service is running smallweb service status -
Set the
domainfield in your smallweb config to your domain name.
# open the smallweb config in your default editor
smallweb config
-
From your cloudflare dashboard, navigate to
Zero Trust > Networks > Tunnels -
Click on
Create a tunnel, and select theClouflaredoption -
Follow the intructions to install cloudflared, and create a connector on your device.
-
Add a wildcard hostname for your tunnel (ex:
*.<your-domain>), and usehttp://localhost:7777as the origin service.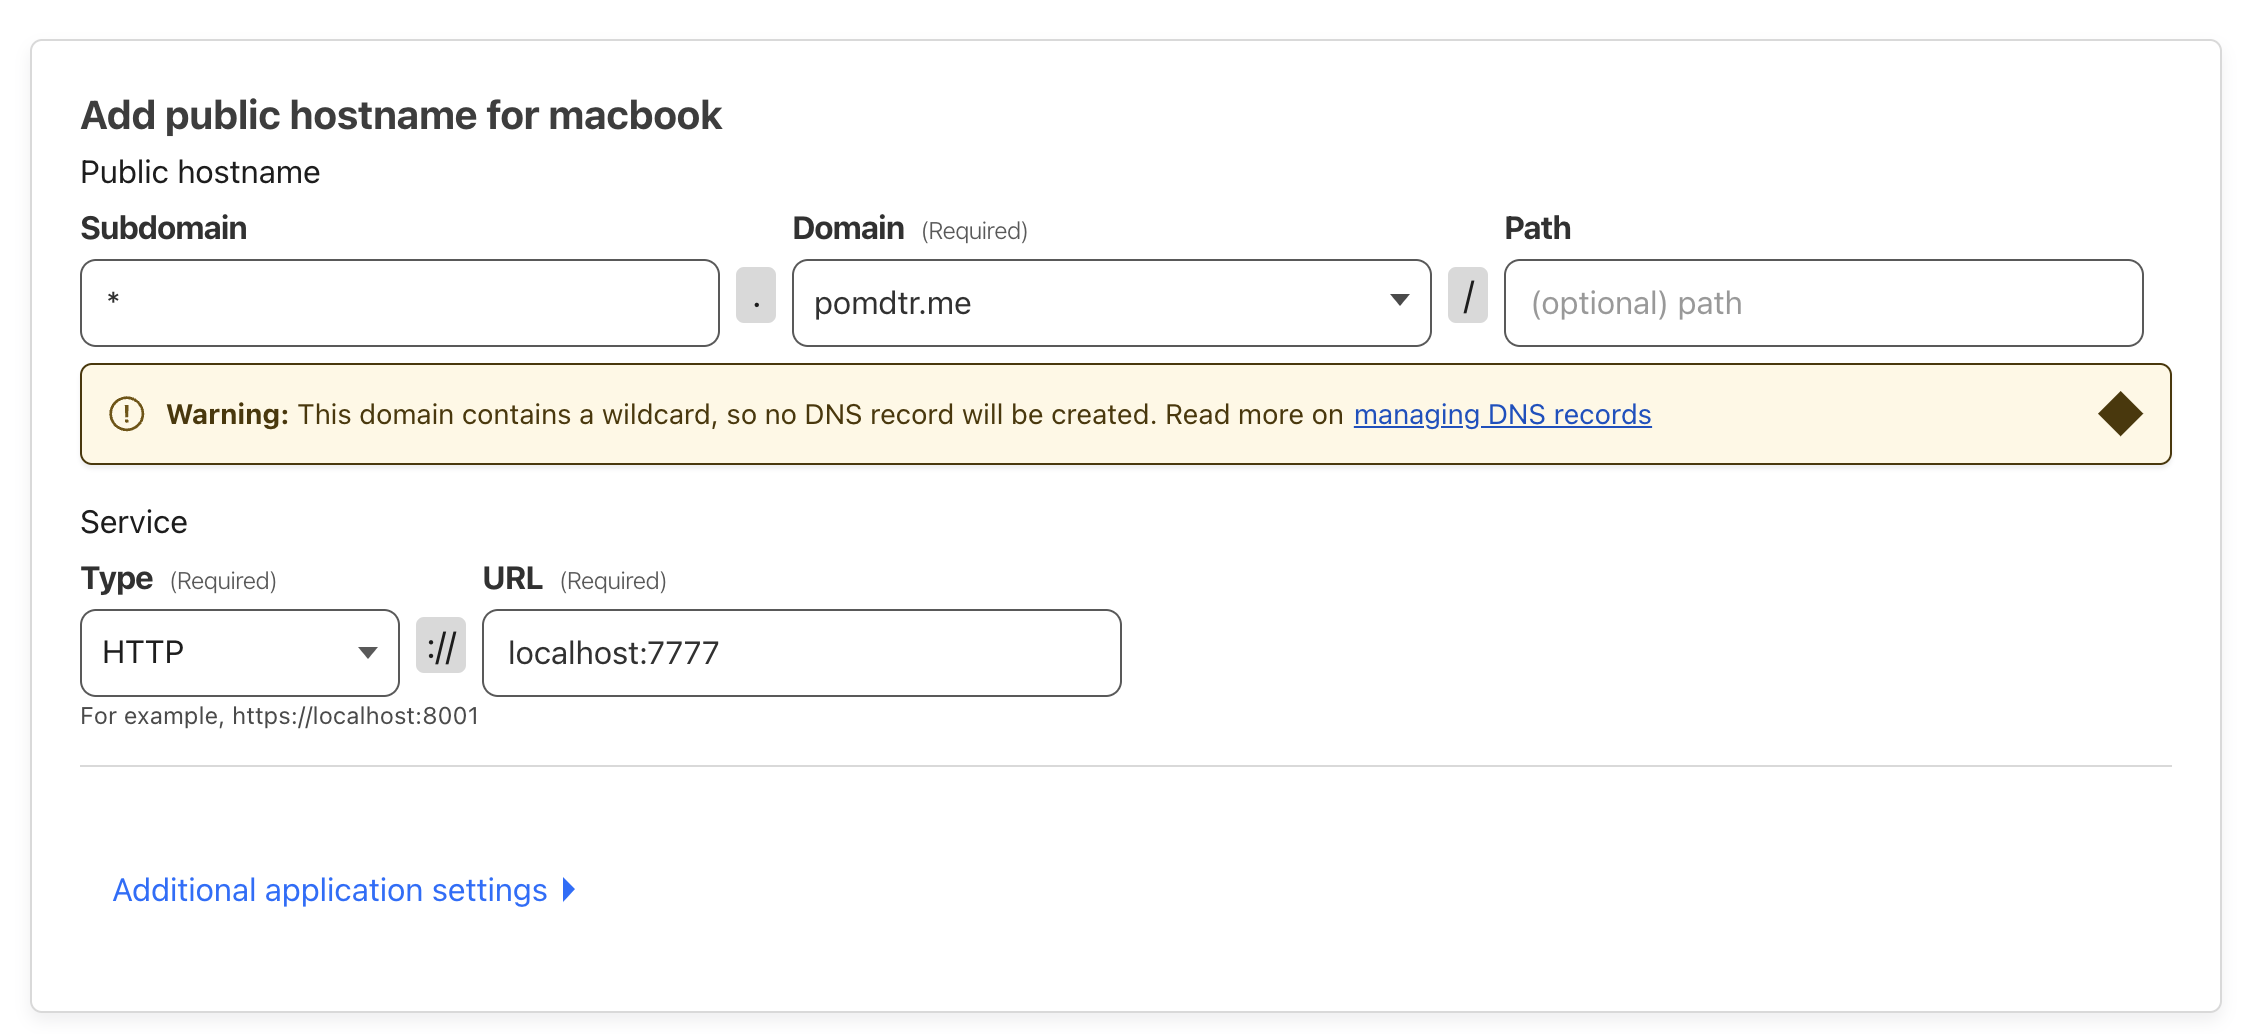
-
Do the same for your apex domain, if you want to manage it using smallweb.
-
Copy the tunnel ID, and go to
Websites > DNS > Records. -
Add a new
CNAMErecord for your wildcard hostname, with a target of<tunnel-id>.cfargotunnel.com.

Checking that your tunnel is running
Create a dummy smallweb app in ~/smallweb/example
mkdir -p ~/smallweb/example
CAT <<EOF > ~/smallweb/example/main.ts
export default {
  fetch() {
    return new Response("Smallweb is running", {
      headers: {
        "Content-Type": "text/plain",
      },
    });
  }
}
EOF
If everything went well, you should be able to access https://example.<your-domain> in your browser, and see the message Smallweb is running.
Optional Steps
- You can protect your tunnel (or specific apps) with Cloudflare Access.
VPS / Home Server
If you're using a Debian-based Server, you can follow these steps to setup smallweb, assuming you're logged in as root.
These steps will also work on other distributions, but you may need to adjust the package manager commands.
# create user with homedir and default shell
useradd --system --user-group --create-home --shell $(which bash) smallweb

# set a password for the smallweb user
passwd smallweb

# give the user sudo access (optional)
usermod -aG sudo smallweb

# allow the user to use systemd
usermod -aG systemd-journal smallweb

# run user services on login
loginctl enable-linger smallweb
At this point, you can switch to the smallweb user (ex: using ssh smallweb@<ip>) and install smallweb:
# install unzip (required for deno)
sudo apt update && sudo apt install unzip

# install deno
curl -fsSL https://deno.land/install.sh | sh # install deno

# install smallweb
curl -sSfL https://install.smallweb.run | sh # install smallweb

# start the smallweb service
smallweb service install
To make your service accessible from the internet, you have multiple options:
- setup a reverse proxy on port 443 (I use caddy)
- using cloudflare tunnel (see cloudflare setup)
Syncing files using mutagen
I recommend using mutagen to sync your files between your development machine and the server.
First, install mutagen on your development machine, then enable the daemon using mutagen daemon register, and finally, run the following command to sync your files:
mutagen sync create --name=smallweb --ignore-vcs --ignore=node_modules \
    ~/smallweb smallweb@<server-ip>:/home/smallweb/smallweb
From now on, each time you make a change to your files, they will be automatically synced to the server, and vice versa.
Your git repository will only be present on one machine, you can choose if you want to keep it on your development machine or on the server. Syncing git repositories is not recommended.
I also prefer to skip syncing the node_modules folder, as deno automatically fetches them when needed.
Deno Deploy
If one of your websites is starting to get a lot of traffic, you might want to deploy it to a cloud provider.
Deno Deploy is a cloud platform that allows you to deploy your Deno apps with ease. It's a great choice for smallweb apps, since it's built on top of Deno, and it's very easy to use.
To deploy an app, you'll just need to:
-
Install the
deployctlcli:deno install -Arf jsr:@deno/deployctl -
Run
deployctl deploy, and follow the instructions.
Beware, all Deno APIs are not available in Deno Deploy. For example, you won't be able to write files to the filesystem.
Global Config
The smallweb config is located at ~/.config/smallweb/config.json[c]. It is a json file that defines global settings for smallweb.
You can also specify a custom config file by setting the SMALLWEB_CONFIG environment variable.
Smallweb also respects the XDG_CONFIG_HOME environment variable.
Available Fields
host
The host field defines the host to bind to. By default, it is 127.0.0.1.
{
  "host": "0.0.0.0"
}
port
The port field defines the port to bind to. By default, it is 7777.
{
  "port": 8000
}
domain
The domain field defines the apex domain used for routing.
{
  "domain": "smallweb.run"
}
See the Routing guide for more information.
dir
The dir field defines the root directory for all apps.
{
  "dir": "~/smallweb"
}
email
The email field is required to enable lastlogin authentication for private apps.
If it is not set, private will show a basic auth prompt instead.
{
  "email": "[email protected]"
}
env
The env field defines a list of environment variables to set for all apps.
{
  "env": {
    "NODE_ENV": "production"
  }
}
customDomains
The customDomains field defines a list of custom domains to map to apps. It supports wildcards.
{
  "customDomains": {
    "pomdtr.me": "pomdtr",
    "sandbox-*.pomdtr.me": "pomdtr"
  }
}
Default Config
By default the config file looks like this:
{
  "host": "127.0.0.1",
  "port": 7777,
  "domain": "localhost",
  "dir": "~/smallweb",
  "env": {
    // allow smallweb apps to communicate with each other when using self-signed certificates
    "DENO_TLS_CA_STORE": "system"
  }
}
Global Configuration Reference
The smallweb configuration can be defined in a smallweb.json[c] file at the root of the project. This config file is optional, and sensible defaults are used when it is not present.
A json schema for the config file is available here.
You can set it using a $schema field in your smallweb.json[c] file:
{
  "$schema": "https://schema.smallweb.run",
}
VS Code users can also set it globally in their settings.json:
{
  "json.schemas": [
    {
      "url": "https://schema.smallweb.run",
      "fileMatch": [
        "smallweb.json",
        "smallweb.jsonc"
      ]
    }
  ]
}
Available Fields
entrypoint
The entrypoint field defines the file to serve. If this field is not provided, the app will look for a main.[js,ts,jsx,tsx] file in the root directory.
root
The root field defines the root directory of the app. If this field is not provided, the app will use the app directory as the root directory.
private
If the private field is set to true, the app will ask for your admin username and password before serving the app using basic auth.
privateRoutes
If you only want to protect a subset of routes, you can use the privateRoutes field. This field is an array of routes that require authentication.
{
  "privateRoutes": [
    "/private",
    "/admin/*"
  ]
}
publicRoutes
If you want to make a subset of routes public, you can use the publicRoutes field. This field is an array of routes that do not require authentication.
{
  "private": true,
  "publicRoutes": [
    "/public/*",
  ]
}
crons
The crons field defines a list of cron jobs to run. See the Cron Jobs guide for more information.
{
  "crons": [
    {
      "name": "daily-task", // The name of the cron task (required)
      "description": "A daily task", // A description for the task (optional)
      "schedule": "0 0 * * *", // a cron expression (required)
      "args": [] // arguments to pass to the task (required)
    }
  ]
}
CLI Reference
smallweb
Host websites from your internet folder
Options
-h, --help help for smallweb
smallweb api
Interact with the smallweb API
smallweb api [flags]
Options
  -d, --data string          Data to send in the request body
  -H, --header stringArray   HTTP headers to use
  -h, --help                 help for api
  -X, --method string        HTTP method to use (default "GET")
smallweb app
Manage apps
Options
-h, --help help for app
smallweb app create
Create a new smallweb app
smallweb app create <app> [flags]
Options
  -h, --help              help for create
  -t, --template string   The template to use
smallweb app delete
Delete an app
smallweb app delete [flags]
Options
-h, --help help for delete
smallweb app fork
Fork an app
smallweb app fork [app] [new-name] [flags]
Options
-h, --help help for fork
smallweb app help
Help about any command
Synopsis
Help provides help for any command in the application. Simply type app help [path to command] for full details.
smallweb app help [command] [flags]
Options
-h, --help help for help
smallweb app list
List all smallweb apps
smallweb app list [flags]
Options
  -h, --help   help for list
      --json   output as json
smallweb app open
Open an app in the browser
smallweb app open [app] [flags]
Options
-h, --help help for open
smallweb app rename
Rename an app
smallweb app rename [app] [new-name] [flags]
Options
-h, --help help for rename
smallweb capture
Extension capture
smallweb capture [flags]
Options
-h, --help help for capture
smallweb changelog
Show the changelog
smallweb changelog [flags]
Options
-h, --help help for changelog
smallweb completion
Generate the autocompletion script for the specified shell
Synopsis
Generate the autocompletion script for smallweb for the specified shell. See each sub-command's help for details on how to use the generated script.
Options
-h, --help help for completion
smallweb completion bash
Generate the autocompletion script for bash
Synopsis
Generate the autocompletion script for the bash shell.
This script depends on the 'bash-completion' package. If it is not installed already, you can install it via your OS's package manager.
To load completions in your current shell session:
source <(smallweb completion bash)
To load completions for every new session, execute once:
Linux:
smallweb completion bash > /etc/bash_completion.d/smallweb
macOS:
smallweb completion bash > $(brew --prefix)/etc/bash_completion.d/smallweb
You will need to start a new shell for this setup to take effect.
smallweb completion bash
Options
  -h, --help              help for bash
      --no-descriptions   disable completion descriptions
smallweb completion fish
Generate the autocompletion script for fish
Synopsis
Generate the autocompletion script for the fish shell.
To load completions in your current shell session:
smallweb completion fish | source
To load completions for every new session, execute once:
smallweb completion fish > ~/.config/fish/completions/smallweb.fish
You will need to start a new shell for this setup to take effect.
smallweb completion fish [flags]
Options
  -h, --help              help for fish
      --no-descriptions   disable completion descriptions
smallweb completion help
Help about any command
Synopsis
Help provides help for any command in the application. Simply type completion help [path to command] for full details.
smallweb completion help [command] [flags]
Options
-h, --help help for help
smallweb completion powershell
Generate the autocompletion script for powershell
Synopsis
Generate the autocompletion script for powershell.
To load completions in your current shell session:
smallweb completion powershell | Out-String | Invoke-Expression
To load completions for every new session, add the output of the above command to your powershell profile.
smallweb completion powershell [flags]
Options
  -h, --help              help for powershell
      --no-descriptions   disable completion descriptions
smallweb completion zsh
Generate the autocompletion script for zsh
Synopsis
Generate the autocompletion script for the zsh shell.
If shell completion is not already enabled in your environment you will need to enable it. You can execute the following once:
echo "autoload -U compinit; compinit" >> ~/.zshrc
To load completions in your current shell session:
source <(smallweb completion zsh)
To load completions for every new session, execute once:
Linux:
smallweb completion zsh > "${fpath[1]}/_smallweb"
macOS:
smallweb completion zsh > $(brew --prefix)/share/zsh/site-functions/_smallweb
You will need to start a new shell for this setup to take effect.
smallweb completion zsh [flags]
Options
  -h, --help              help for zsh
      --no-descriptions   disable completion descriptions
smallweb config
Open the smallweb config in your editor
smallweb config [flags]
Options
  -h, --help   help for config
  -j, --json   Output as JSON
smallweb cron
Manage cron jobs
Options
-h, --help help for cron
smallweb cron help
Help about any command
Synopsis
Help provides help for any command in the application. Simply type cron help [path to command] for full details.
smallweb cron help [command] [flags]
Options
-h, --help help for help
smallweb cron list
List cron jobs
smallweb cron list [flags]
Options
      --app string   filter by app
  -h, --help         help for list
      --json         output as json
smallweb cron trigger
Trigger a cron job
smallweb cron trigger <id> [flags]
Options
-h, --help help for trigger
smallweb docs
Generate smallweb cli documentation
smallweb docs [flags]
Options
-h, --help help for docs
smallweb fork
Fork an app
smallweb fork [app] [new-name] [flags]
Options
-h, --help help for fork
smallweb gallery
Extension gallery
smallweb gallery [flags]
Options
-h, --help help for gallery
smallweb help
Help about any command
Synopsis
Help provides help for any command in the application. Simply type smallweb help [path to command] for full details.
smallweb help [command] [flags]
Options
-h, --help help for help
smallweb log
Show logs
Options
-h, --help help for log
smallweb log console
Show console logs
smallweb log console [flags]
Options
      --app string   filter logs by app
  -h, --help         help for console
      --json         output logs in JSON format
smallweb log cron
Show cron logs
smallweb log cron [flags]
Options
  -h, --help          help for cron
      --host string   filter logs by host
      --json          output logs in JSON format
smallweb log help
Help about any command
Synopsis
Help provides help for any command in the application. Simply type log help [path to command] for full details.
smallweb log help [command] [flags]
Options
-h, --help help for help
smallweb log http
Show HTTP logs
smallweb log http [flags]
Options
  -h, --help          help for http
      --host string   filter logs by host
      --json          output logs in JSON format
smallweb run
Run an app cli
smallweb run <app> [args...] [flags]
Options
-h, --help help for run
smallweb service
Manage smallweb service
Options
-h, --help help for service
smallweb service help
Help about any command
Synopsis
Help provides help for any command in the application. Simply type service help [path to command] for full details.
smallweb service help [command] [flags]
Options
-h, --help help for help
smallweb service install
Install smallweb as a service
smallweb service install [flags]
Options
-h, --help help for install
smallweb service logs
Print service logs
smallweb service logs [flags]
Options
  -f, --follow   Follow log output
  -h, --help     help for logs
smallweb service restart
Restart smallweb service
smallweb service restart [flags]
Options
-h, --help help for restart
smallweb service start
Start smallweb service
smallweb service start [flags]
Options
-h, --help help for start
smallweb service status
View service status
smallweb service status [flags]
Options
-h, --help help for status
smallweb service stop
Stop smallweb service
smallweb service stop [flags]
Options
-h, --help help for stop
smallweb service uninstall
Uninstall smallweb service
smallweb service uninstall [flags]
Options
-h, --help help for uninstall
smallweb token
Manage api tokens
Options
-h, --help help for token
smallweb token create
Create a new token
smallweb token create [flags]
Options
      --admin                admin token
  -a, --app strings          app token
  -d, --description string   description of the token
  -h, --help                 help for create
smallweb token delete
Remove a token
smallweb token delete <id> [flags]
Options
-h, --help help for delete
smallweb token help
Help about any command
Synopsis
Help provides help for any command in the application. Simply type token help [path to command] for full details.
smallweb token help [command] [flags]
Options
-h, --help help for help
smallweb token list
List all tokens
smallweb token list [flags]
Options
  -h, --help   help for list
  -j, --json   output as JSON
smallweb up
Start the smallweb evaluation server
smallweb up [flags]
Options
-h, --help help for up
smallweb upgrade
Upgrade to the latest version
smallweb upgrade [version] [flags]
Options
-h, --help help for upgrade
smallweb view
Extension view
smallweb view [flags]
Options
-h, --help help for view